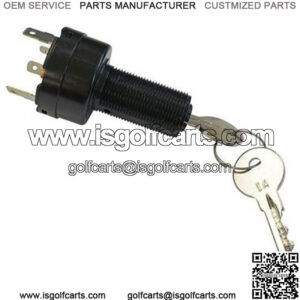
The ignition switch on a golf cart is crucial for getting the vehicle started and operating as smoothly as possible.
It pulls electricity from the battery and sends a charge to the engine that gets your cart running.
However, there are a few issues that may occur with an ignition switch that may cause your cart to fail to start.
These issues can be very concerning.
We broke down this article into the three main brands – EZGO, Club Car, and Yamaha – to give readers a better understanding.
Though the process is pretty similar between the three brands, it is different enough to make separate sections necessary.
HOW TO TEST & INSTALL A GOLF CART IGNITION SWITCH
TESTING THE EZGO SWITCH
EZGO carts usually have a very strong and reliable ignition switch that rarely runs into any troubles.
This manufacturer works hard to keep their carts reliable and usually provides the type of extra-quality that a cart owner deserves.
However, there comes a time when this switch may malfunction and cause complications.
For example, an ignition switch failure may cause a cart to fail to start.
However, it may also trigger riding issues, such as a jerking cart or other problems that can be quite unexpected and frustrating.
Thankfully, testing the EZGO switch isn’t too complex – EZGO is renowned for making their carts easy to understand and diagnosed by the average person.
However, you need to follow these steps:
- Examine the battery pack to find black and red wires – these should be common on both gas and electric carts, minimizing any confusion
- Take the black wire – a probe wire – and connect it to the negative terminal on your cart – this probe should be black for easier identification
- Connect the red wire to the back of the battery pack to a neutral area – you perform this step to ground the wires and make it easier to see where electricity flows
- Leave the key in the off position but attach the wires to a probe meter, one at a time, to check for voltage – one should have some voltage while the other should not
- Turn the key to the on position – the wire that had no voltage should now have some and if not, there is an issue with your ignition switch
When working on a cart in this way, make sure that you carefully handle the battery and the wires to avoid getting shocked.
Wearing a good set of gloves is a smart idea here.
You may also want to wear goggles – though the risk of a battery explosion or a similar reaction is small, we cannot stress the importance of being careful and staying safe enough in this situation.
And what if your cart does have ignition switch issues?
Then, you need to take immediate steps to repair your cart to ensure that it runs smoothly.
But what kind of steps are necessary in this situation?
That depends on what is wrong with your ignition.
In most cases, though, you’re probably going to have to fully replace the switch with a new one to ensure that things go smoothly for you.
INSTALLING A CLUB CAR IGNITION SWITCH
The instructions below should give you more than enough details for this installation:
- Look at your serial number plate and find the model number
- Contact Club Car or an online vendor and order an ignition switch based on the model number
- Turn off your cart and disconnect the battery to keep your cart safe
- Remove the screws for the ignition switch plate and disconnect the attached wires
- Take out the console and remove the ignition switch
- Put in the new ignition switch where the old one sat
Now, you need to change up the wiring connection pattern to follow the proper process.
Rather than attaching them the way that your EZGO manual suggests, you must follow the steps outlined below.
Doing so will ensure that you create a strong electrical connection and keep your cart operating as smoothly as possible in this situation:
- Connect the red wire to the bottom left connector
- Run the black wire to the top left connector
- Take the yellow wire to the bottom right connector
The big difference here is that your EZGO cart will have a blue wire instead of a yellow wire.
This wire serves the same purpose on both models but will be color-coded differently.
While you probably could have figured this out on your own due to the process of elimination, we want to make sure that all of our readers are fully aware of the proper wiring order here.
Note: We should point out that Club Car uses both push-button and key switches for their golf carts.
The ignition method is basically the same here with a few minor differences.
For example, you usually attach the wires to further terminals on the solenoid rather than the closest when installing on a key switch.
Talk to a cart specialist if you are uncertain to avoid making a bad mistake here.

